Showing posts with label Rimmel London. Show all posts

Thursday, April 14, 2011

Mario Inspired Nail Design

I did these nails last night inspired by some Mario mushrooms & Bomb Omb. Enjoy!

Thumb: Joe Fresh White, Sally Hansen Yellow, Rimmel's Fever, Wet'n'Wild's Black
Index: Joe Fresh White, Rimmel's Fever, Wet'n'Wild's Black
Middle: Wet'n'Wild's Black, Joe Fresh White, Sally Hansen Yellow, Sally Hasen's Blue Me Away, Billie Cosmetic's Orange
Ring: Joe Fresh White, Wet'n'Wild's Black, Ardene 7B-4081
Pinky: Rimmel's Blue Me Away, Joe Fresh White, Wet'n'Wild's Black


Tuesday, April 12, 2011

Fun and Fruity, Summertime / Green Gradient Glitter Nail Design

I received my fruit nail slices in the mail today! I know the title is very long, but I love this design.

Products Used:
- NYX Sour Lime Polish
- CoverGirl Sparkle Topcoat
- Rimmel Topcoat
- Assorted Fruit Slices


Thursday, April 7, 2011

Nighttime / Club Inspired Nails

I did my nails again tonight- inspired by club lights, and the night sky. I decided to do this look because my good friend Emily turns 18 today, and we were going to go out and celebrate tomorrow. :)

Products:
- Wet'n'Wild's Black
- NYX Cosmetic's Asphalt
- Rimmel's Topcoat
- 1 Star Rhinestone
- 3 Round Black Rhinestones


Wednesday, April 6, 2011

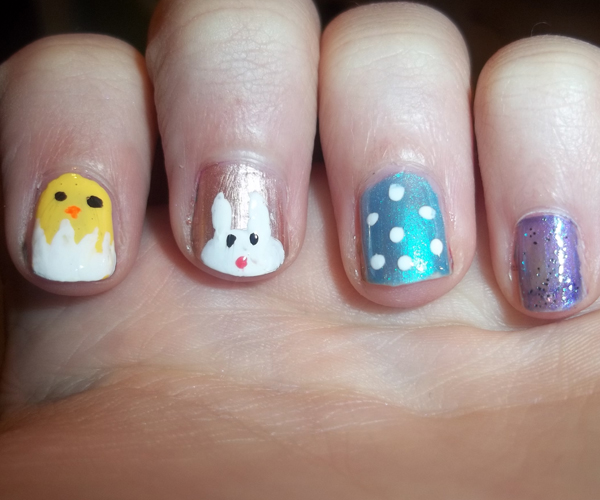
Cute Easter Nail Art

Easter's coming up! I finally did some more nail art, I'm definitely getting better. I got way too many pictures, hahah.

Thumb: NYX Cosmetic's Lime  (base) + Joe Fresh White (dots)

Index Finger: Sally Hansen's Lightning (base) + Joe Fresh White (cracked shell) + Wet'n'Wild's Black (eyes) + Billie Cosmetic's Neon Orange (beak)

Middle Finger: Rimmel's 366 Beige (base) + Joe Fresh White (body) + Wet'n'Wild's Black (eyes) + Rimmel's Flirt (nose)

Ring Finger: NYX Cosmetic's South Sea (base) + Joe Fresh White (dots)


Pinky Finger: QUO's Flirt mixed with Joe Fresh White (base) + CoverGirl's Amethyst Mist (sparkle topcoat)


Thursday, March 10, 2011

Lucky Green St.Patty's Nails

I did this really quick and easy nail design today for St.Patty's Day. Its cute, simple and easy to do. I applied Rimmel's 60 Second's Nail Polish in Camouflage as a base, then applied NYX Cosmetic's Gold Sparkle on top of that. Then apply Rimmel's Quick Dry Top Coat to finish it off. What I like about this combo is that when the light hits your nails, the green colours in Camouflage really pop, and the gold glitter from Gold Sparkle makes it so much more fun and PERFECT for St.Patrick's Day!

Saturday, February 26, 2011

Tutorial: Easy MAC + Milk Look

If you're a fan of MAC Cosmetics on Facebook you might have noticed them uploading pictures from fashion shows and etc. They uploaded a ton of this really nice glitter-y glossy look. Here's how to get a similar look using minimal and inexpensive products.

What You'll Need: A plastic lunch bag / zip lock. A clear lipgloss (Rimmel's Royal Gloss in Gourmet). A nice glitter of your choice (NYX Glitter in Gold and Apple). A synthetic brush  (QUO's Large Concealer brush). And a primer, which is optional (Too Faced Shadow Insurance).


Step 1: Prime your eyelids with Too Faced Shadow Insurance.


Step 2: Squeeze out some of Rimmel's Gourmet lipgloss onto the plastic bag, about the size of a dime for now.


Step 3: Pour some glitter onto the gloss, I'm adding two different colour (NYX Cosmetic's Glitter in Apple and Gold) glitters for a different effect.


Step 4: Mix it all around with the synthetic concealer brush until you get a good consistency. Depending on how much glitter or gloss you put in, you might want to add more of either. It all just depends on how much you really want.

Step 5: Apply the glitter gloss to your eyelids and blend it upwards.

Step 6: Apply more to your lower lashline.

Add mascara if you want. Theres so many different things you can do for this look. Theres tons of different styles of glitters you can get, and using different techniques you can achieve different effects! Try the glitter gloss on your lips too!


Monday, February 7, 2011

Tutorial: Nothern Lights

I wanted to do a really light shimmery look, so this is what I came up with yesterday.

Step 1: After priming your lids with Too Faced Shadow Insurance, apply NYX Cosmetic's Jumbo Eye Pencil in Milk.


Step 2: Blend it out with your finger.


Step 3: Apply Maybeline's Shimmery White eyeshadow all over your lid, with a small flat eyeshadow brush.


Step 4: Using a fluffy brush, apply more of Maybeline's Shimmery White eyeshadow into the crease, and blend it upwards to the browbone.


Step 5: Using a fluffy brush again, apply MAC's Stars'n'Rockets eyeshadow into your crease. Blend well.


Step 6: Apply MAC's Aquadisiac eyeshadow to the outter third of your lid, and then blend inwards towards the center.


Step 7: Apply MAC's Aquadisiac eyeshadow right under the start of your eyebrows, and blend downwards into the groove at the side of your nose. (See pictures) Blend well.


Step 8: Apply Clinique's High Lengths Mascara.


Step 9: Contour your face with Rimmel London's Pink Sugar blush.


Step 10: Apply MAC's Gel Lipstick (From the Champale Collection).


Step 11: Apply NYX Cosmetic's 24 Karet lipgloss to the center of your lips, and blend it out.