Here's a fresh, springy makeup tutorial. The pop of green on the lower lashline really adds a punch of colour to this simple look. The great thing about this look is that its SO versatile, you can switch up the colours to whatever you like.
Enjoy!
Step 1: Apply a primer to your eye. Blend it out everywhere, make sure to get under your eye as well. Primers are great for the Summer, they make sure your makeup doesn't melt away- like your ice cream. :)
Step 2: Apply Estee Lauder's eyeshadow in Tea Biscuit all over your eyelid, your crease, and even your browbone. Blend out the edges with a fluffy blending brush.
Don't have TEA BISCUIT? Try.. MAC's Phloof, and even some colours on the 88 palette.
Step 3: Lightly apply MAC's Sun Blonde eyeshadow just above your crease, and outter corner. Blend it outwards with a fluffy blending brush.
Don't have SUN BLONDE? Try.. Nars Mangrove, MAC's Jasmine, MAC's Going Bananas
Step 4: Lightly trace your lower lashline with GOSH Cosmetic's Green Grass eyeliner kohl.
Step 5: Re-apply Green Grass in a thicker line, following the shape of your eye. Clean up any bumpy lines.
Step 6: Using a small, flat eyeshadow brush, apply MAC's Sassy Grass eyeshadow on top of Green Grass. Blend it out with a fluffy blending brush.
Don't have SASSY GRASS? Try.. NYX Cosmetic's Lake Algae, & the bright green shade on the 88 Palette.
Step 7: Apply Smashbox's eyelash primer to both your top and bottom lashes. This step isn't mandatory!
Step 8: Apply Yves Rocher Luminelle Ultra Volume mascara to your eyelashes.
Step 9: Apply some false eyelashes for extra boldness.
Monday, May 30, 2011
Tutorial: Weird, Whispy Bubble Pony
Here it is, as promised. The first hairstyle tutorial on ChromaticMakeup. I hope you all enjoy this tutorial, and maybe try this out for yourself. This hairstyle is a lot of fun, and super cute for summer.
What You Will Need: 3 elastics (or more), a comb, volumizing hairspray (optional), bobbi pins (optional).
Step 1: Start off by tying your hair up with an elastic, into a medium-high or high ponytail. As you can see, my hair is shorter and reddish because I got it done a couple weeks ago.
(Apologies for the colour weirdness in this picture, it was a little out of focus and flash was being weird.)
Step 2: Using that comb, tease tease TEASE (back-comb) your entire ponytail. The more you tease it, the better the result. Once you have a huge rat looking thing hanging off your head, you're ready for the next step.
If you want less whispyness, use the bobbi pins to pin up any extra hair. Also, if you feel it's necessary, use a volumizing spray to bump up the volume. I personally didn't use either things!
Step 3: Take another elastic, and tie it near the center of your ponytail. You should be able to see the bubble effect.
Then tease the rest of your ponytail AGAIN just to add more bubbly-ness to the last bubble.
Step 4: Tie the last elastic in the center of the rest of your hair from the ponytail.
If you have enough hair, go for another bubble! But don't forgot to tease your hair even more.
This look is VERY versatile, believe it or not! I rock this look with super blunt bangs that hang down over my eyebrows.
Now Introducing Hairstyles!
 |
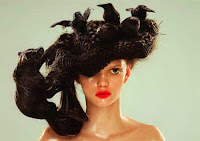
| Crazy Hairstyle found on Google |
The inspiration came to me last night when I posted a beautiful picture of model Dree Hemingway to my Facebook Page. She had gorgeous eye makeup that reminded me of my Constellations makeup look, but another thing that caught my eye was her beautifully braided hair. I've posted the image below for you all to check out. HAIRSTYLES COMING SOON!
Makeup Mag News: L'Oréal USA Pulls Shu Uemura from U.S. Stores
"Another popular cosmetic brand is leaving United States department stores and boutiques: L'Oréal USA has announced it will phase out retail operations for Shu Uemura in the coming months. According to L'Oréal USA representatives, the decision was based on the brand's relatively low stateside sales.
"Shu Uemura is a unique and vibrant brand, but it represents a very small part of our luxury business," said Carol Hamilton, president of L'Oréal USA's luxury division, in a statement. "We decided that L'Oréal USA would be better served by focusing on our other strategic luxury brands like Lancôme, Yves Saint Laurent, Giorgio Armani, Ralph Lauren, Kiehl's and fragrances."
Because L'Oréal USA declined to disclose sales numbers for specific brands, it's not clear how Shu Uemura sales compared to those of other L'Oréal-owned luxury brands." Read the full story here...
Sunday, May 29, 2011
Beauty Icon of the Week: Daisy Lowe
 |
| Daisy Lowe for VOGUE |
 She is a 22 year old English fashion model who began modeling at the age of 2 (whoa). She began doing more photoshoots at the ages 12 and 14, and at 15 she was approached by a talent scout in Camden Town. She was signed with Select modeling agency (in London).
On the runway, she was selected by Karl Lagerfeld to model for Chanel, and has appeared on catwalks in New York, Milan and London for Topshop and designers such as PPQ, Nanette Lepore, Sue Stemp, Charlotte Ronson, Henry Holland, and Vivienne Westwood. She has modelled for Agent Provocateur lingere for the past three years, and has been used by Burberry, Converse shoes, Dr. Martens, Hooch, Wheels and Doll Baby, Ben Sherman, Frost French, Hari, Karen Millen, Diesel SpA and Whistles, as well as for her mother's recent collection of lace dresses.
She has done many magazine editorials such as: Tatler, Elle, GQ, Vogue, Paradis, Marie Claire, Interview, Jalouse, Teen Vogue, Dirty Glam, Grazia, In Style, Nylon and The Sunday Times Style amongst many others.
In February 2006, Lowe was featured in Italian Vogue, shot by New York photographer Steven Klein, who also shot her in March 2007 for a W magazine pictorial called "Xurbia". In September 2006, Lowe modelled for the Urban Outfitters catalogue, appeared in French Connection printed advertisements and was profiled in British Harper’s Bazaar. She was featured in an editorial in Jane magazine alongside fellow model Lydia Hearst-Shaw in March 2007, appeared in Italian Vogue for the second time in May, and in August, posed nude on the cover of i-D magazine with her then-partner, Will Cameron of the band Blondelle, photographed by Terry Richardson. She again shot for Italian Vogue in 2009 at Bancroft's School in a shoot by Miles Aldridge.
Images Source: Daisy-Lowe.com // Info Source: Wikipedia
Crown Brush on Hautelook Tuesday
That's right- Crown Brush will be on Hautelook this TUESDAY! I wanted to give you all a heads up. If you need an invite link, click mine here to get started on HatueLook for free!
Saturday, May 28, 2011
MAC Cosmetic's Surf the Ocean Crushed Metallic Pigment Stack Review, Pictures, and Swatches (Picture Heavy)
Please Read: I am not paid by any cosmetic companies to review any of these products. Everything I review is bought by me, and I will always give a %100 honest review.
- Packaging: These pigments come in 2 different stacks, with 2 shades per stack. They come in clear tube stacks with twist on caps. Each stack is about 2.5 times larger than a regular MAC Pigment, so you're getting a really good deal on these. The regular pigments are $23.50 each (that's $94.00 in total for all four), and all four of these pigments only cost $38.50. So you're getting a pretty good deal on these shades when you buy these.
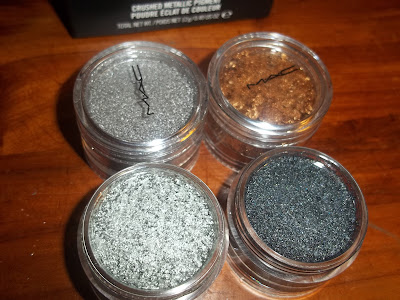
- Product: These pigments are described as “frosty platinum, light yellow green, gold bronze, and dirty graphite with silver pearl.” Each individual shade doesn't have a name. Each of these shades are highly pigmented, and long-lasting. Although it's not necessary, the colours work better when applied wet, or mixed with a mixing medium.
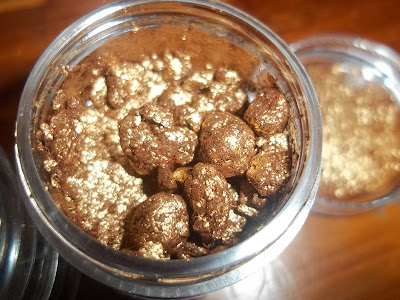
- Stack 1 / Shade 1: is a metallic bronzy-gold shade. In the pot, this shade looks like gold nuggets. See picture 2.
- Stack 1 / Shade 2: is an iridescent, silvery, seafoam green.
- Stack 2 / Shade 1: is a darkened navy blue shade with teal/blue shimmer.
- Stack 2 / Shade 2: is a medium metallic silver/grey shade.
- Final Thoughts: These look amazing! The colours are so fun and pretty. You get an amazing deal when you buy this pigment stack, and I think this is the most impressive thing MAC has released in a long time. This is definitely worth buying, it's limited edition so GO BUY IT WHILE ITS IN STOCK! It's already sold out on the Canadian MAC website, but you could try MACcosmetics.com!
Subscribe to:
Posts (Atom)


